
This recipe gives “finger food” a whole new meaning. My 1st-grader sister-in-law is going to participate in the Halloween parade at her school, and I thought it would be fun to bring some scary treats to share with her classmates. After deliberating with the munchkin, we decided to make finger-shaped cookies.
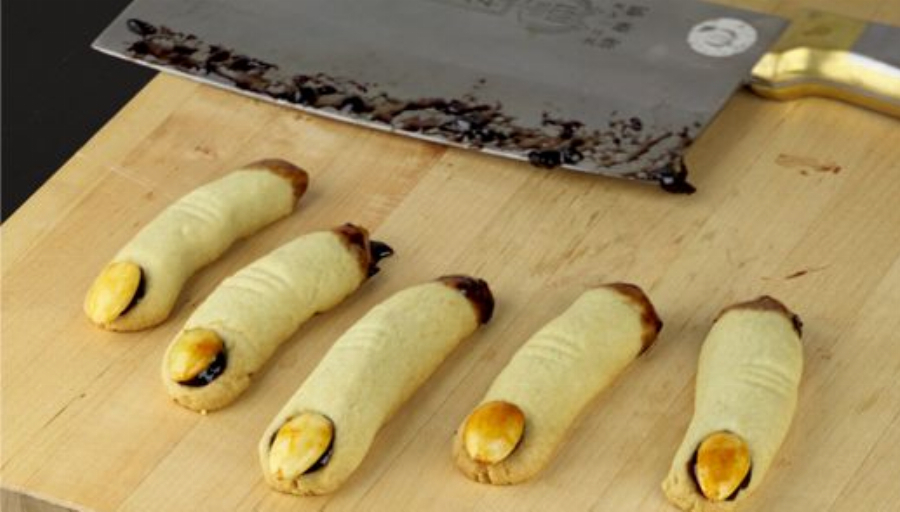
To start, I made the first batch of cookie dough with a few drops of pandan extract to give the cookies a green color. My munchkin helped me out shaping the fingers but we realized they were shaped way too big as they expanded after baking. I exclaimed: ”Those are Shrek’s fingers!” to which my little one responded: ”Why would you chop off Shrek’s fingers?!?!”. After calming her down, we settled on calling them “witch” fingers. I made the second batch much smaller with less pandan to make it more realistically like a witch’s skin (I’m just guessing since I’ve personally never met one). The fingernails are made of candied blanched almonds and the fingers are dipped in fruit preserves to imitate blood.
The finger cookies look very realistic, so I don’t know if they’re appropriate for 6-year-olds. I’ll tell you tomorrow what the reaction was.
1. Info for Witch Finger Cookies (Scary Halloween Food)
- Cook Time: unavailable
- Total Time: unavailable
- Servings: 54
- Calories: unavailable
2. Ingredients for Witch Finger Cookies (Scary Halloween Food)
- 1 egg, at room temperature
- 2 cups granulated sugar
- 2 tablespoons brown sugar
- 16 tablespoons unsalted butter, softened to room temperature
- 1 teaspoon pure almond extract
- 2-½ cups all-purpose flour
- 1 teaspoon pandan extract (see tips), as needed
- 1 teaspoon baking powder
- 3/4 teaspoon salt
- 54 whole almonds, blanched (see tips)
- 1 cup fruit preserves (see tips)
3. Directions:
- Preheat the oven to 325°F.
- In a mixing bowl, beat the egg with 1 cup of sugar until pale yellow foam; the texture of the egg will be thicker. Add the almond extract.
- In a bowl, combine the flour, salt and baking powder.
- Cream the butter with ½ cup of sugar (whisk using a stand-mixer to get as much air as possible into the butter). Add the egg mixture and the dry ingredients. Mix well. Add the brown sugar and the pandan extract. It will give a nice aroma to the cookie dough. Mix well. Chill in the refrigerator until firm for about 30 minutes (this step is optional but it helps shape the cookies).
- Shape the cookies into 5-inch cylinders. Gently press the center to form a knuckle, using your index fingers and thumbs. Make 3-4 lines using the back of a butter knife. Using a whole almond, gently press one end and form a light cavity. Remove the almond. Repeat until all the cookies are shaped into fingers.
- Place the cookies on a baking sheet previously lined with parchment paper or a silicone mat. Make sure they are spaced apart so they don’t touch each other when they expand while baking.
- Bake for about 20 minutes, depending on how soft you prefer them. Remove from the oven. Transfer the cookies to cooling racks. Allow to stand for 10 minutes.
- While the cookies are baking, make the candied almonds. In a non-stick saucepan, melt ½ cup of sugar without any water over high heat. It’s important to carefully watch the sugar; as soon as the edges of the pan start caramelizing, immediately lower the heat to medium-high. Gently jiggle the saucepan in circles. Do not use a spoon! Don’t let the sugar get dark brown or you’ll get a burnt taste. When the caramel is an even light brown color, remove from the heat, pause for about a minute (be careful of splattering when the almonds are added), then slowly add the whole almonds. Stir constantly with a wooden spoon and spread onto parchment paper. Let the sugar cool down a bit. Separate the almonds. Set the candied almonds aside.
- In a small saucepan, bring the fruit preserves to a boil. Set aside.
- Dip one end in warm fruit preserves. Spoon about ½ teaspoon of preserves on the other end (where the fingernail should be) and top with a candied almond. The warm jam will allow the nut to adhere to the cookie. Allow about 15 minutes for the preserves to set.
- Bon appétit!
- Ha ha ha ogre fingers!!!
)